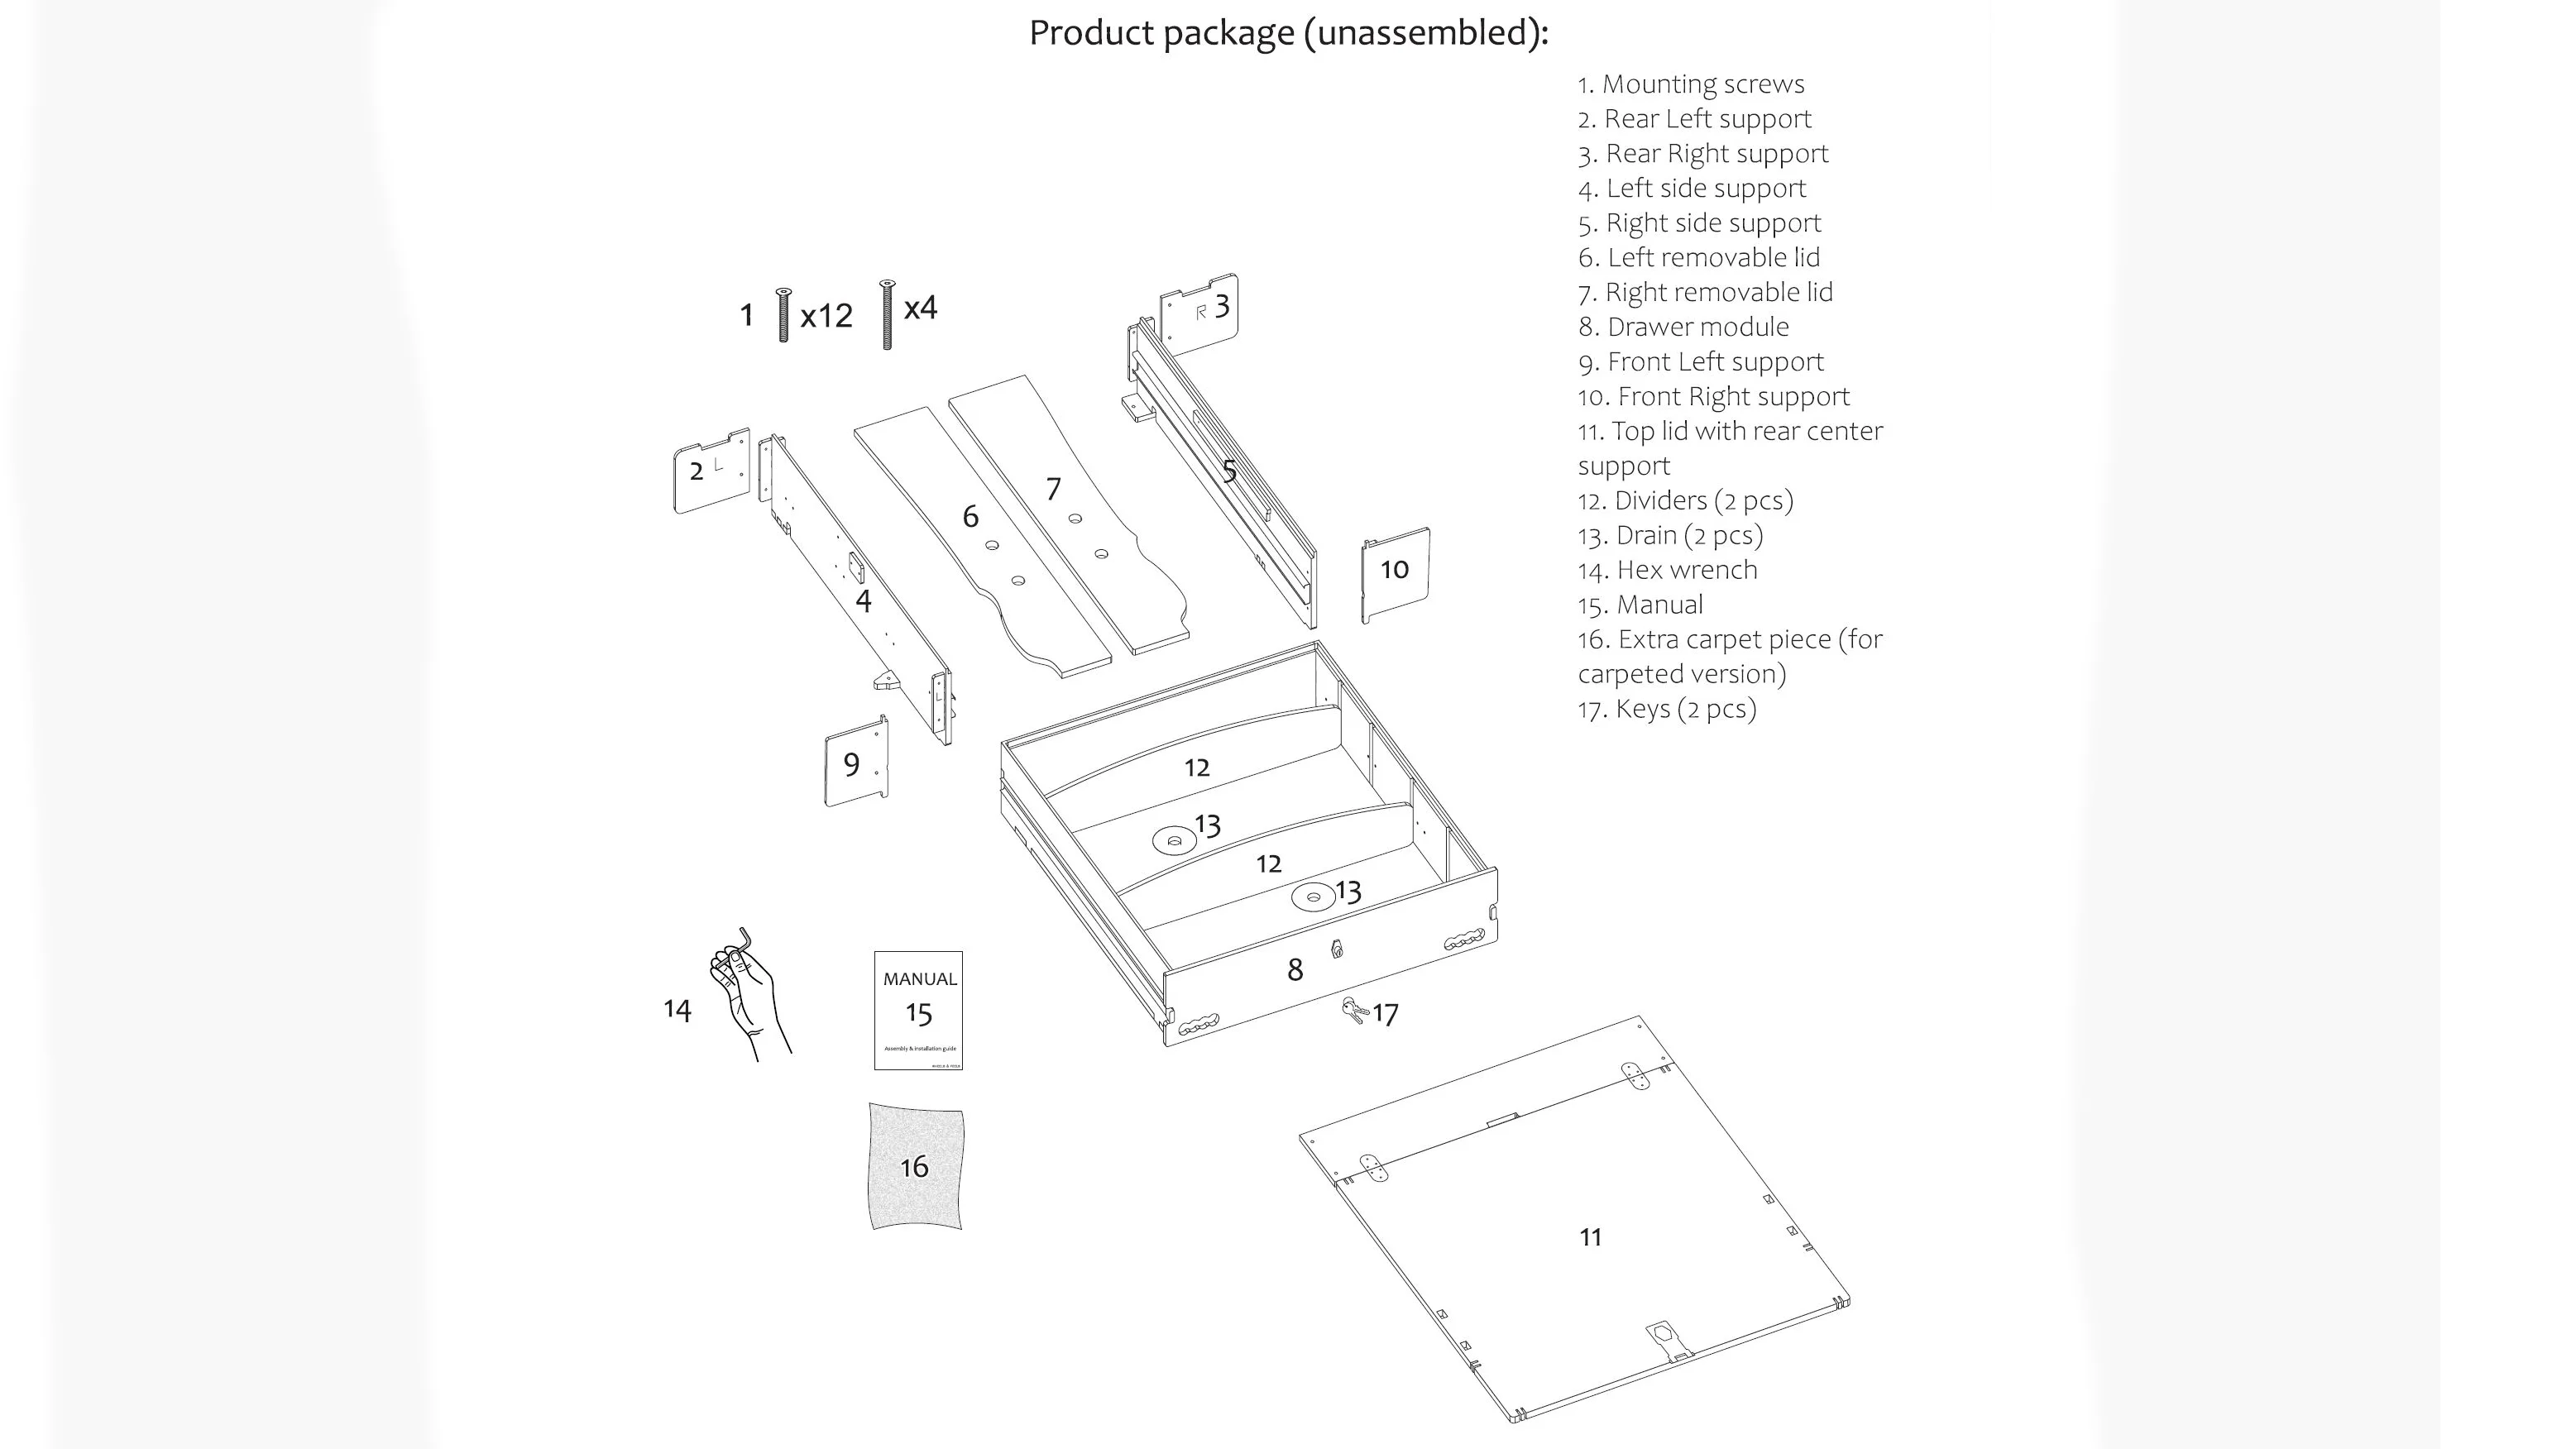
Installation Guide of the Jeep Wrangler JKU Cargo Drawer
Safety Instructions
Tools and Equipment: Use the appropriate tools as outlined in the manual. Ensure all tools are in good working order.
Work Area: Maintain a clean and well-lit workspace. A cluttered or dimly lit area can lead to accidents.
Supervision: Never leave the installation process unattended, especially when tools are in use.
Safety Installation
Vehicle Stability: Park your vehicle on a flat surface with the parking brake engaged during installation.
Lifting: Use proper lifting techniques or get assistance when lifting heavy items like drawers or platforms to avoid injury.
Securing Components: Ensure all parts, particularly drawers and platforms, are securely fastened and locked to prevent movement while driving.
Tool Safety: Exercise caution when using power tools or sharp objects. Always wear appropriate protective gear.
Usage of Drawer and Platform
Weight Limits: Adhere to the recommended weight limits for the drawers and platforms.
Opening/Closing: Ensure drawers and platforms are fully opened or closed before use to prevent accidents.
Contents Secure: Secure items within the drawers and platforms to prevent shifting or spilling during travel.
Servicing
Regular Checks: Regularly inspect all components for signs of wear or damage.
Cleaning: Keep the kit clean and free of debris to maintain functionality and safety.
Repairs: Address any damage or wear immediately, using original parts for replacements.
Emergency
First Aid: Keep a first aid kit in your vehicle for emergencies.
Fire Safety: Carry a fire extinguisher suitable for electrical and automotive fires.
Contact Information: Keep emergency contact information easily accessible.
Green Responsibility
Leave No Trace: Always clean up your campsite and take all trash with you.
Respect Wildlife: Maintain a safe distance from animals and avoid disturbing their natural habitat.
Campfire Safety: Follow local rules for campfires and ensure they are completely extinguished before leaving.
Overnight Safety
Exhaust System Check: Regularly inspect the exhaust system for defects. A faulty exhaust system can pose serious poisoning risks. Ensure proper ventilation inside the vehicle when sleeping overnight. Avoid sleeping in the car with the engine running to prevent carbon monoxide buildup. Always keep a fire extinguisher in your vehicle for emergencies.
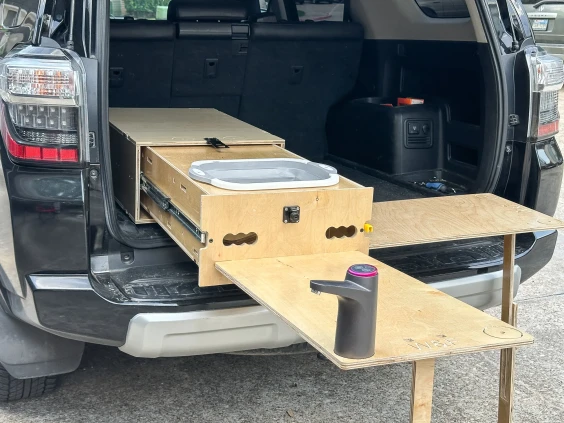
Consider our additional accessories designed to transform your Jeep into a mini camper. We offer both a versatile table and a comfortable sleeping platform, perfect for those who love to explore and want the convenience of a home on wheels.
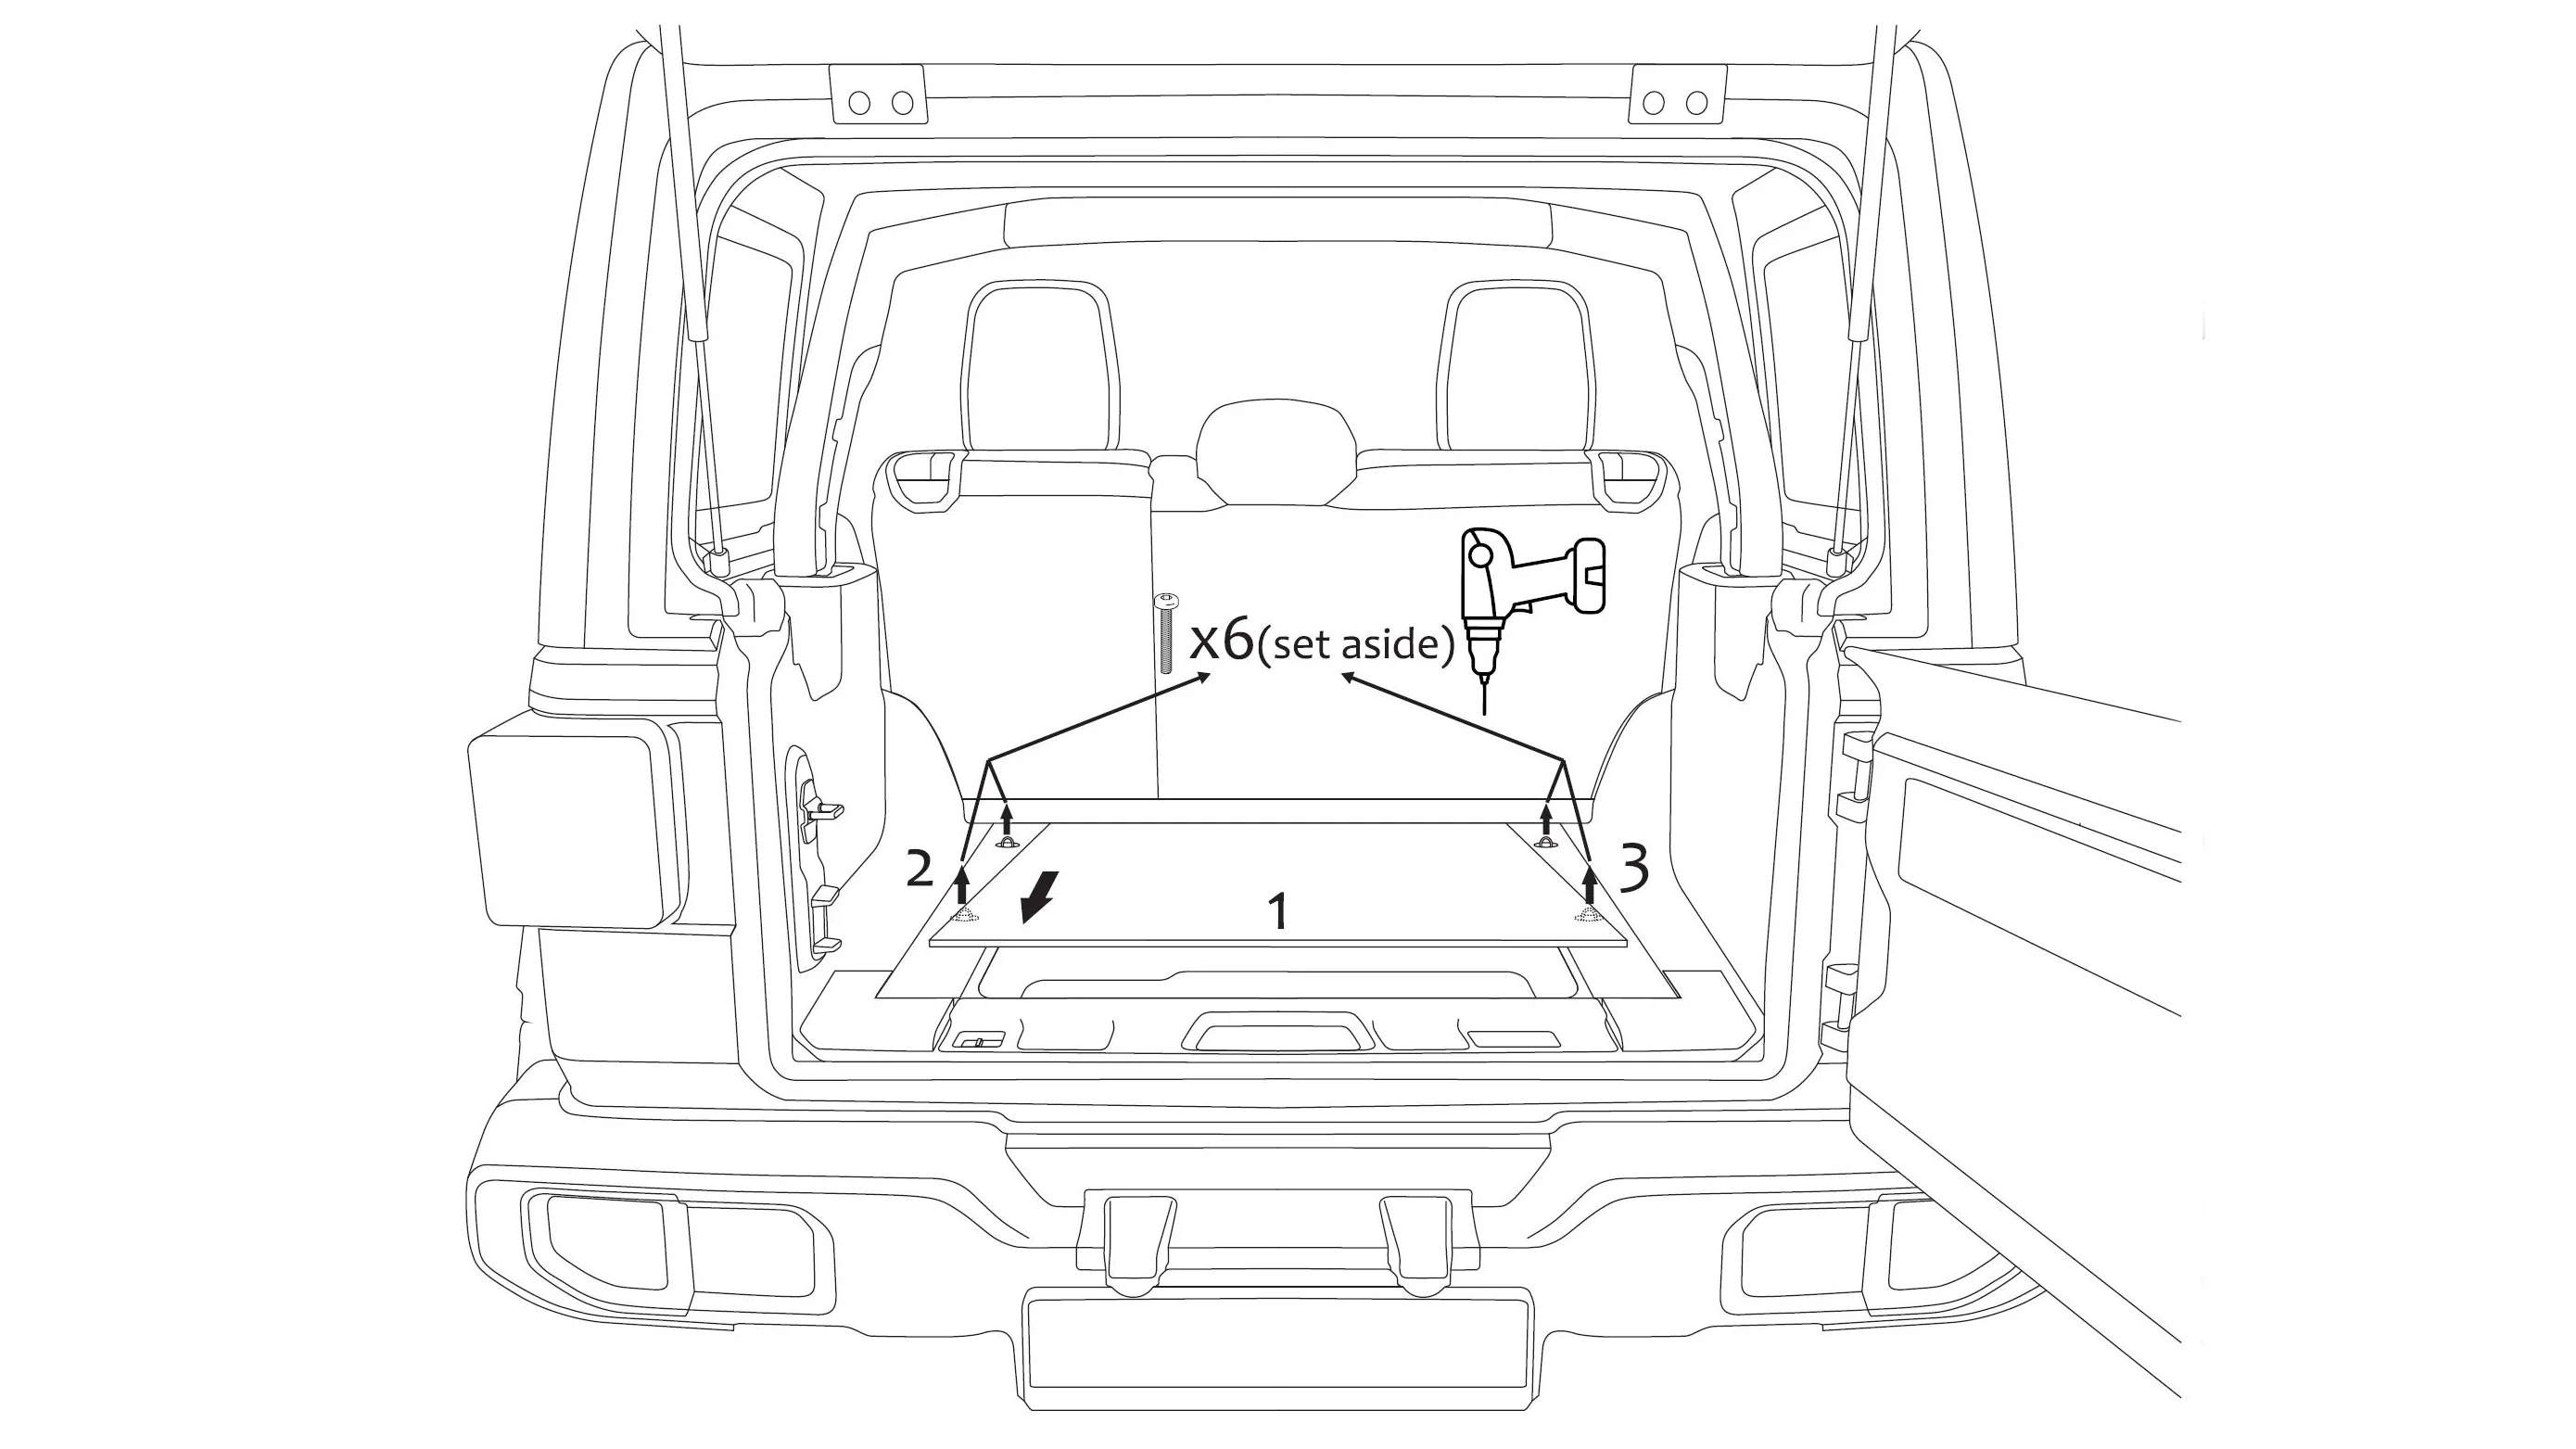
1. Preparing for Installation
Before you begin the installation process, it's important to prepare your vehicle.
Please follow these steps:
De-installation of OEM Mesh Mounts:
Unscrew the 4 factory screws as in the picture on the left. Set them aside. The rings or rails may be located here, depending on the modification.
Clearing the Trunk Space:
Remove items 1, 2, and 3 from the trunk area to create enough space for the installation. Trim the protruding factory carpet to prevent it from colliding with the bottom side of the drawer. Ensure the trunk is clear of any other objects or debris that might interfere with the installation process.
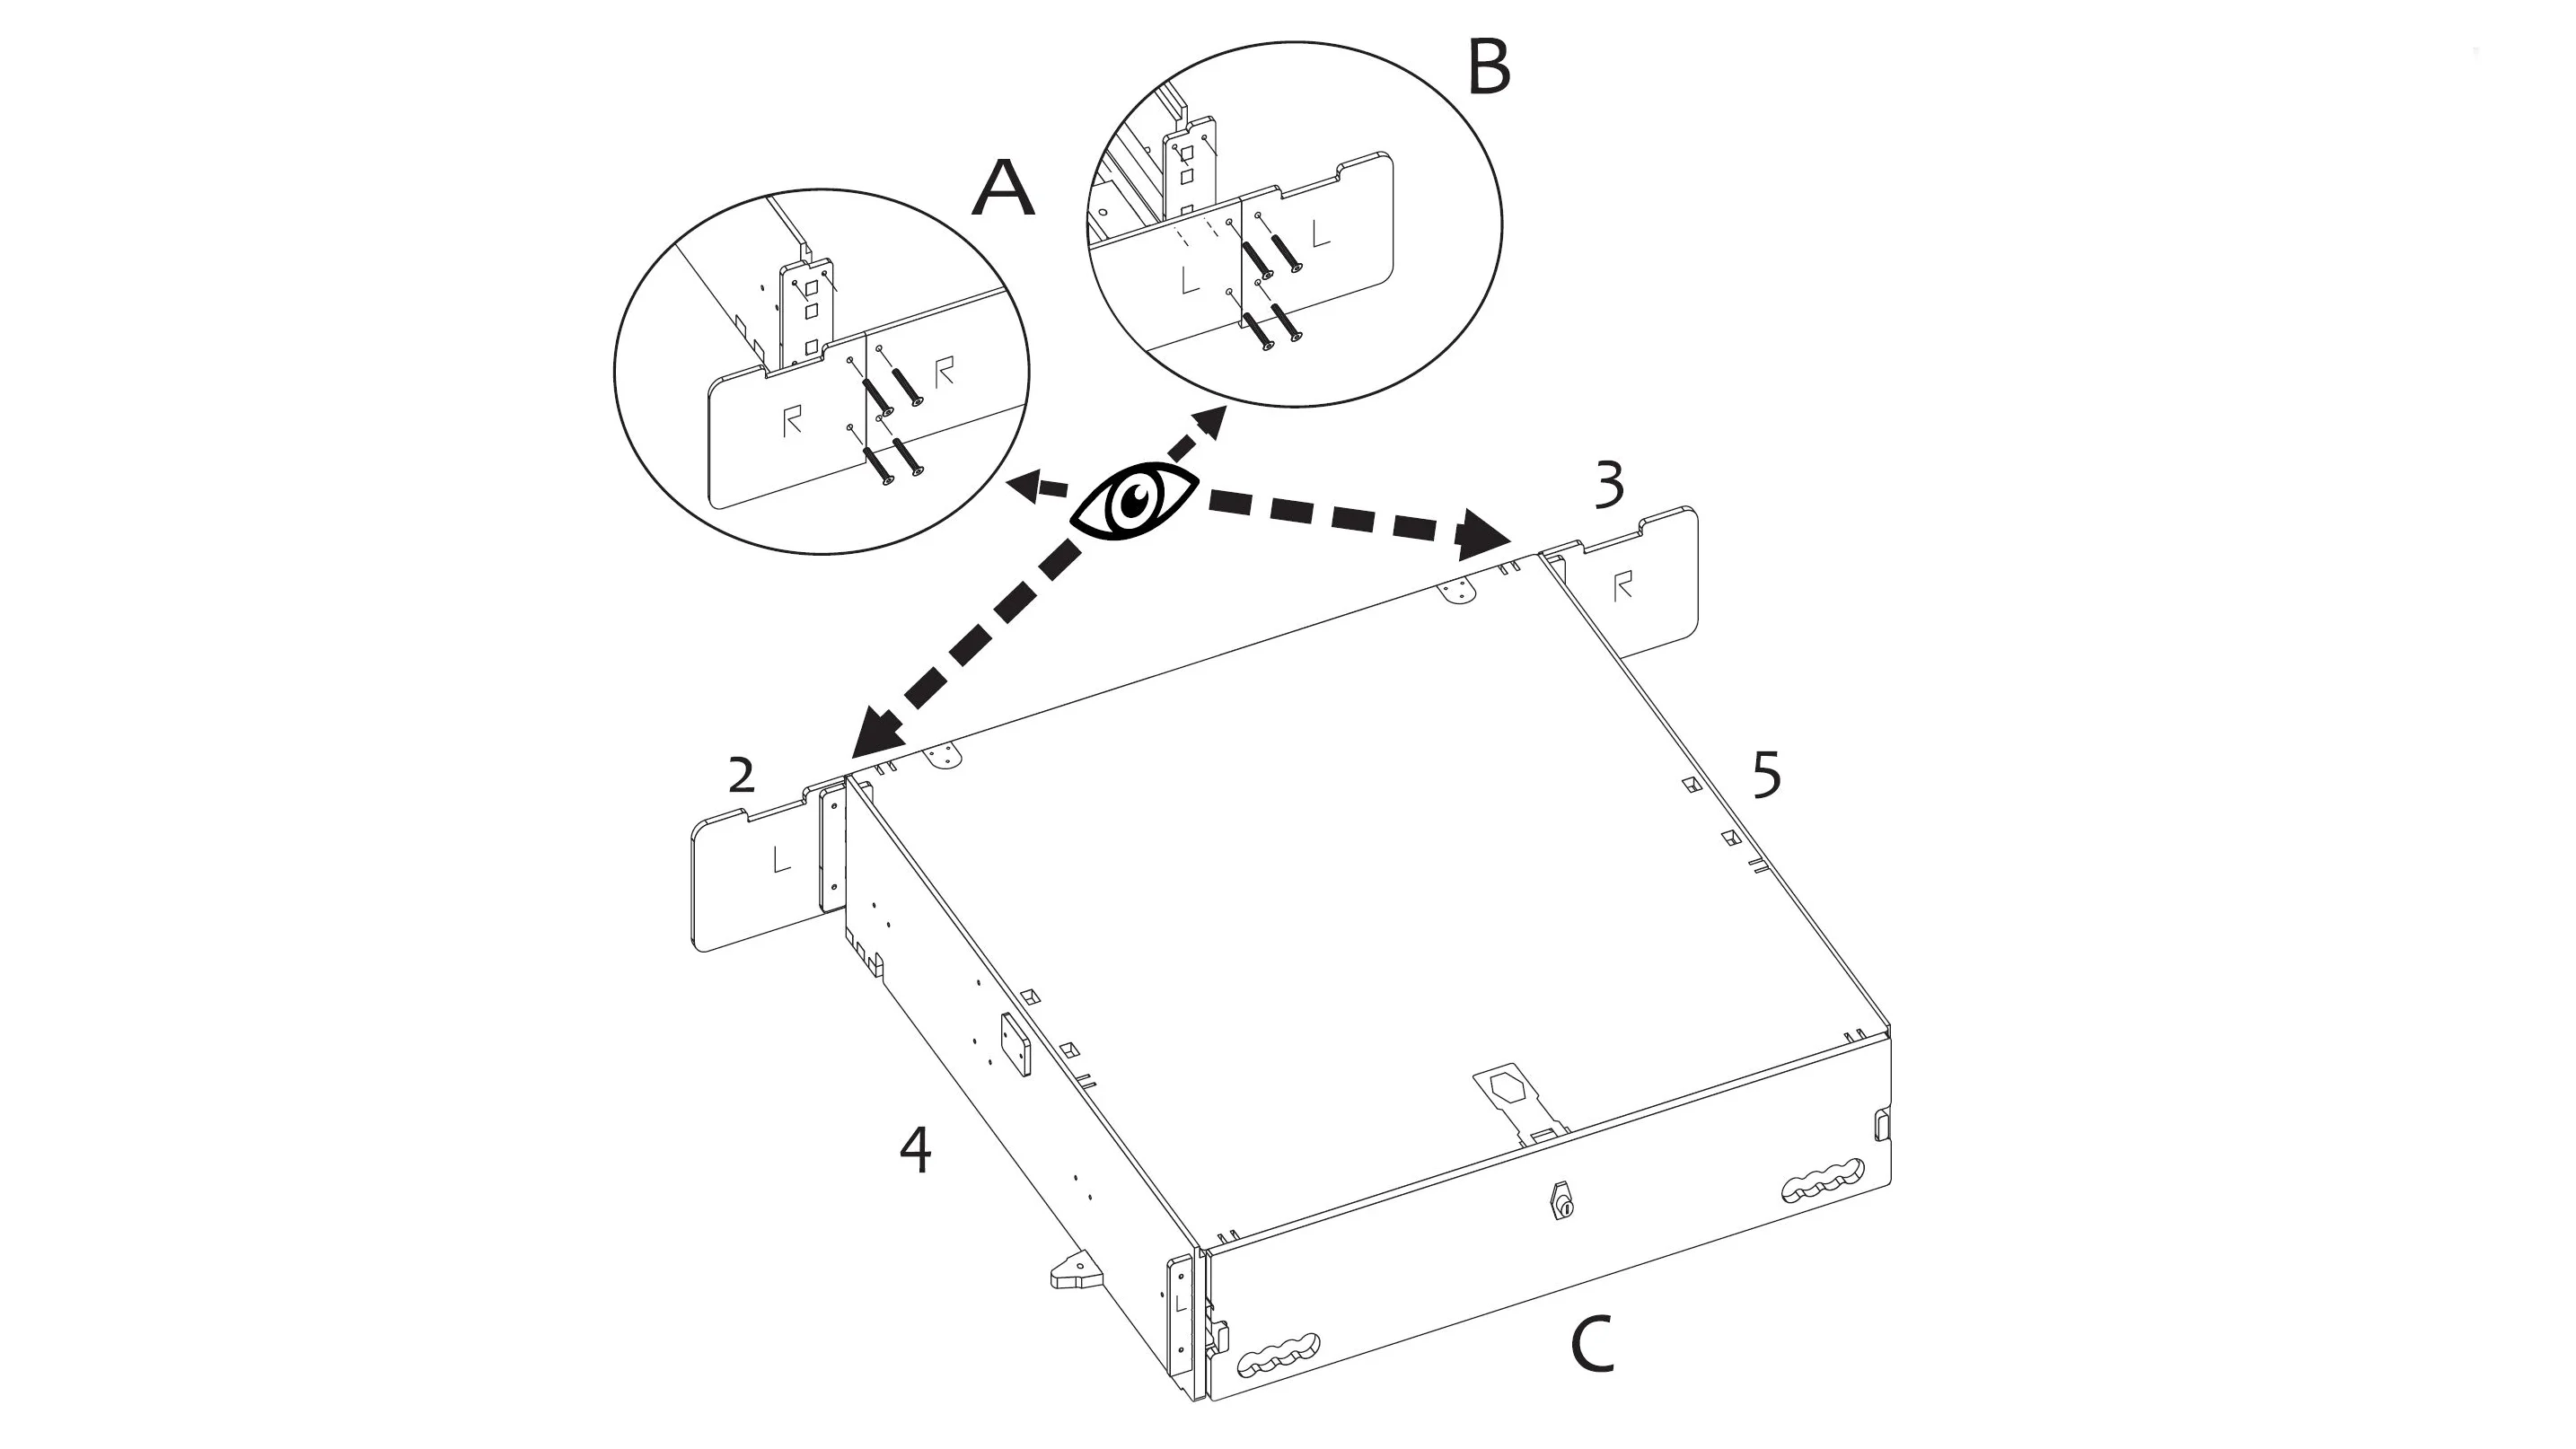
2. Connecting Drawers with Sliders with the installation process.
Preparing the Workspace
Begin by placing Drawer Module (8) on a flat surface. Using a table is recommended for ease of assembly.
Attaching the Left Side support
Take Left Side Support (4) and align its rail with the rail of the drawer, as illustrated in View A. Ensure that the rails are aligned evenly, avoiding any
misalignment. Gently push the left side support towards the drawer facade until it's fully installed.
Attaching the Right Side support
Follow the same procedure with Right Side Support (5).
If the rails don't fit together smoothly, it's likely due to an angle issue. Carefully withdraw the support and try again, ensuring proper alignment without forcing the components. Avoid using excessive force as this can damage the sliders. By following these steps, you should be able to securely and safely attach the drawer supports, ensuring a smooth and functional drawer mechanism.

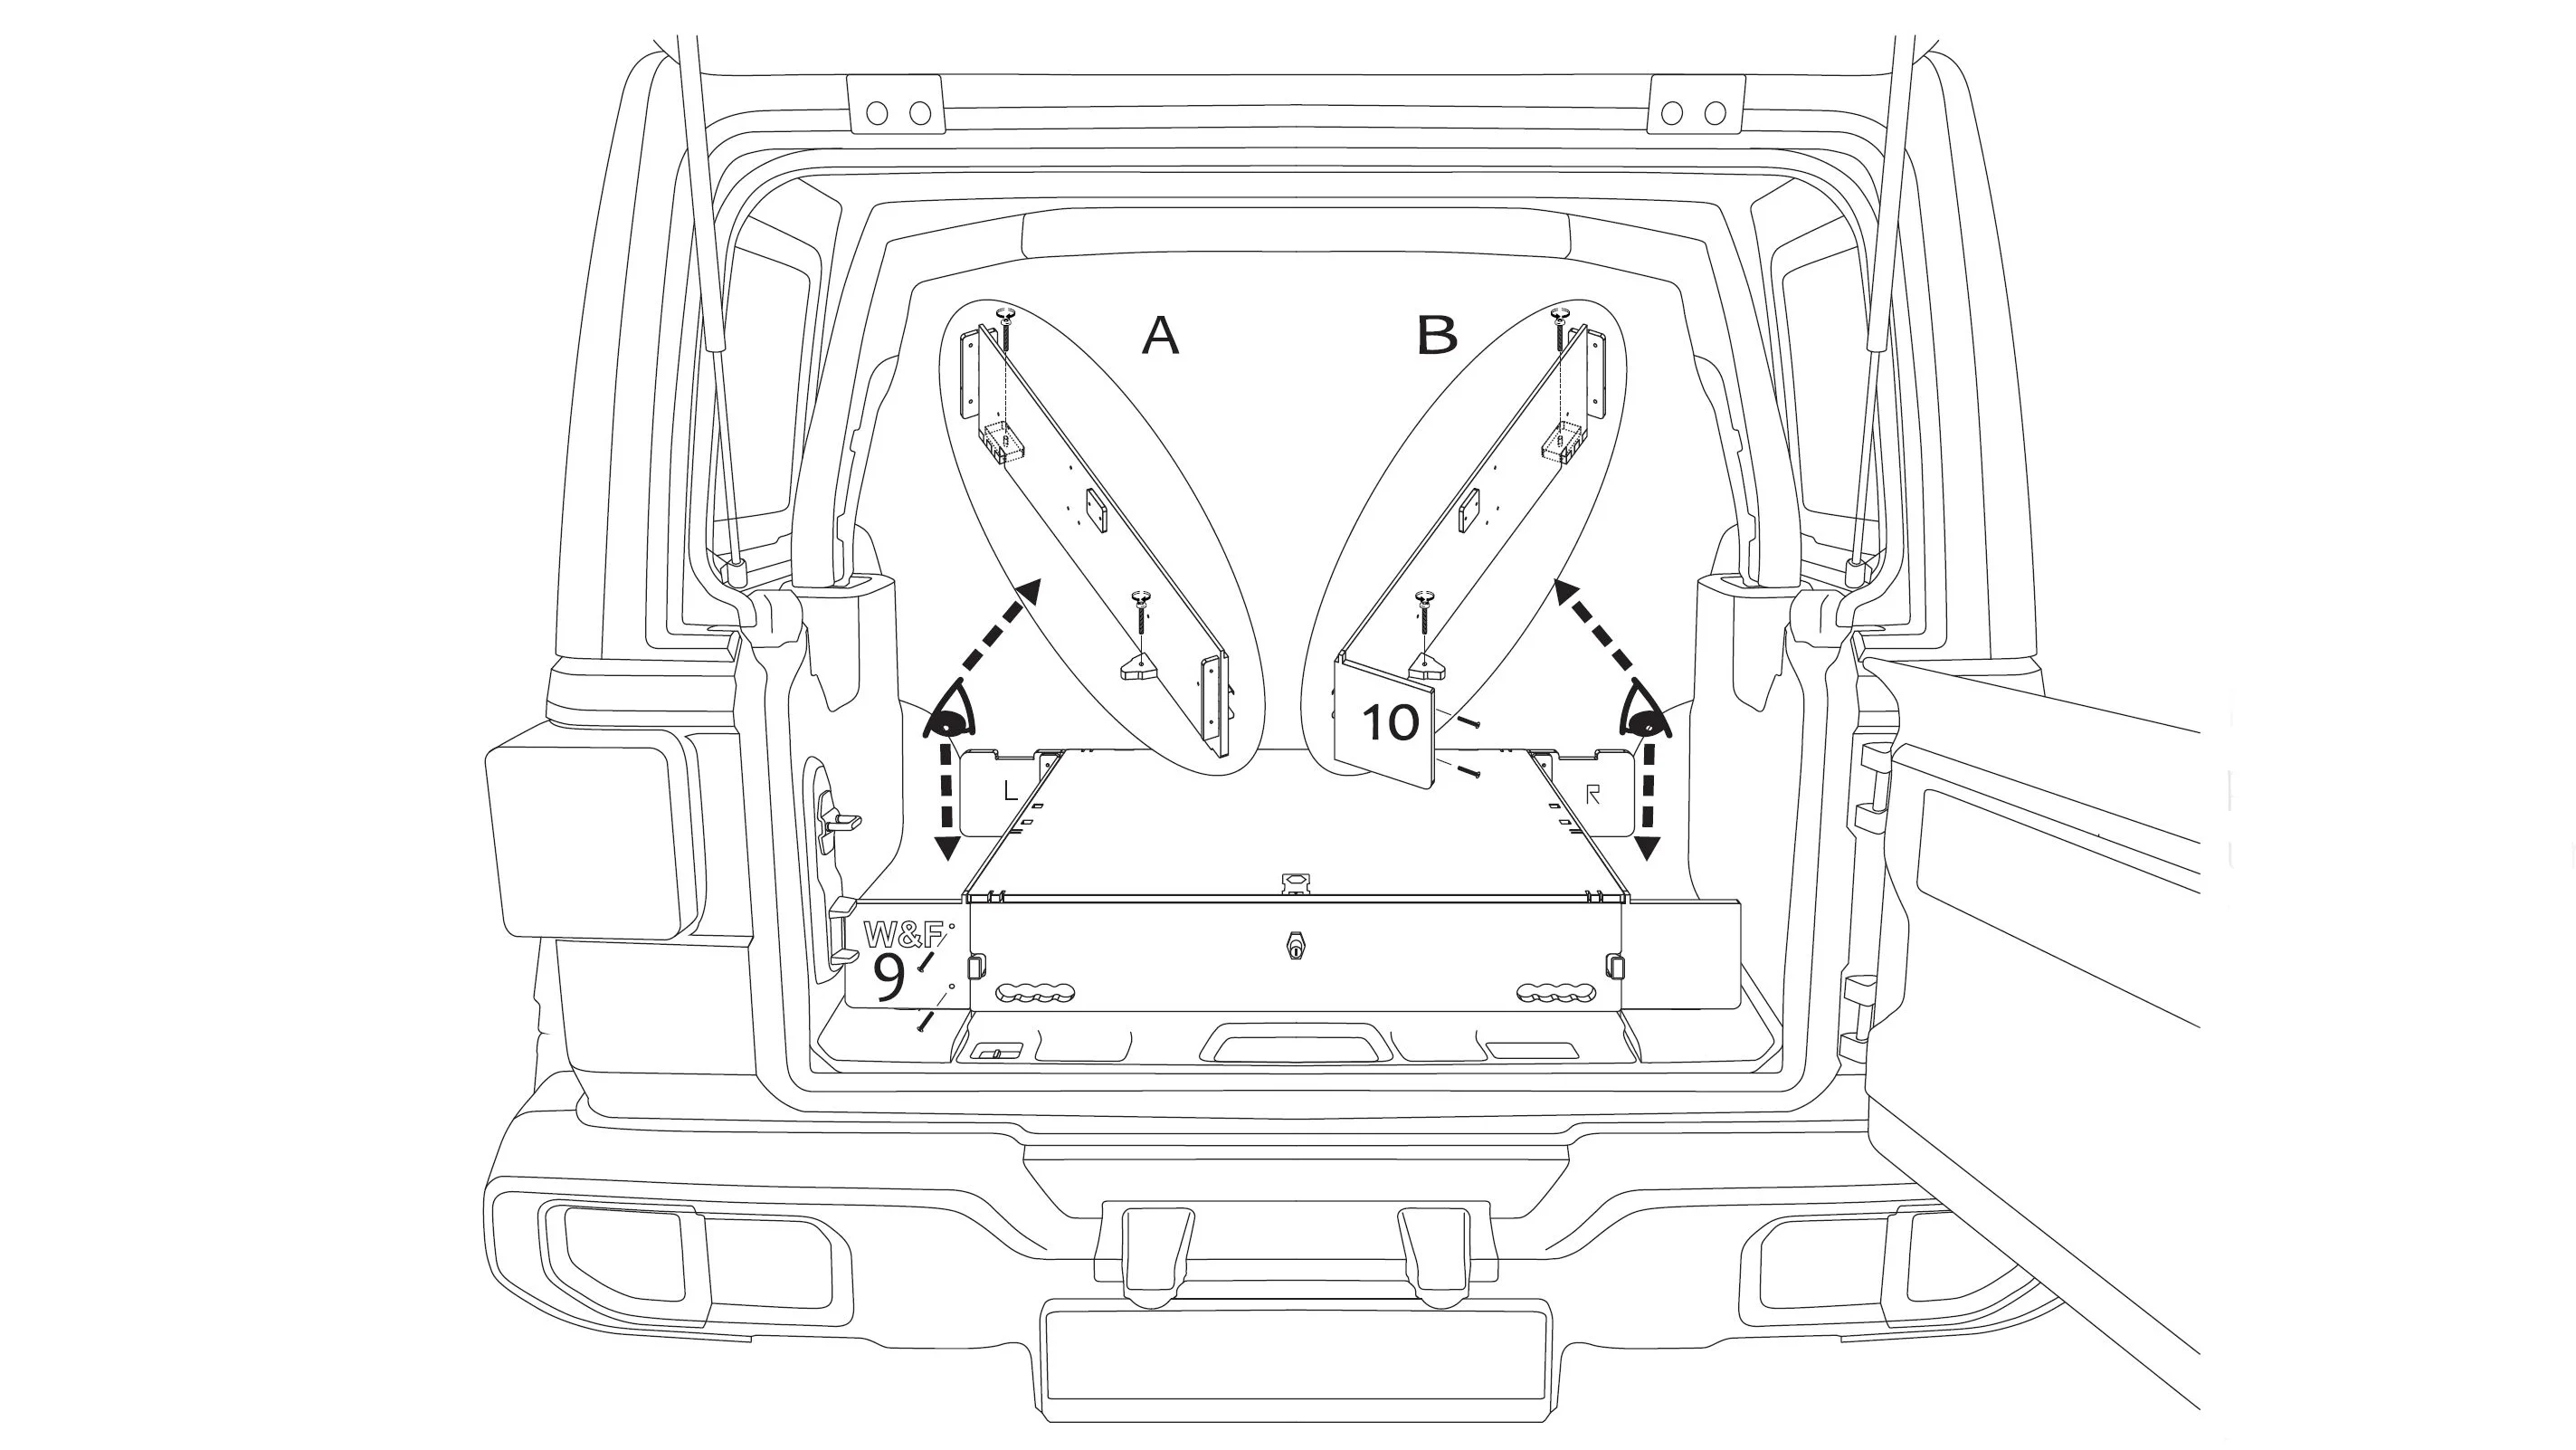
3. Frame Assembly
Take the Top Lid (11) and put it on the drawer precisely. Connect the hinged Center Support of the Top Cover to the Left Support (4) and Right Support (5) by using small screws and wrench provided in the kit. Attach the Rear Left Support (2) to the Left Support (4). Attach the Rear Right Support (3) to the Right Support (5). Refer to View A and B shown right for a visual guide.
Note: Ensure all screws are tightened securely, but avoid over-tightening which might strip the threads. If you have any difficulties, double-check the pictures.
4. Installing the Assembled Drawer
Start by folding down the rear seats to create space in the trunk. Carefully pick up the assembled drawer, keeping in mind that it weighs approximately 40 pounds. If you're not confident about lifting this weight, it's advisable to enlist the help of someone to assist. Before placing the drawer, check to ensure the trunk is free of any foreign objects that might obstruct the installation. Gently insert the drawer into the trunk at a 45-degree angle. This technique is crucial to avoid damaging the rear left and right supports. Once the drawer is correctly angled and positioned, lower it into place.
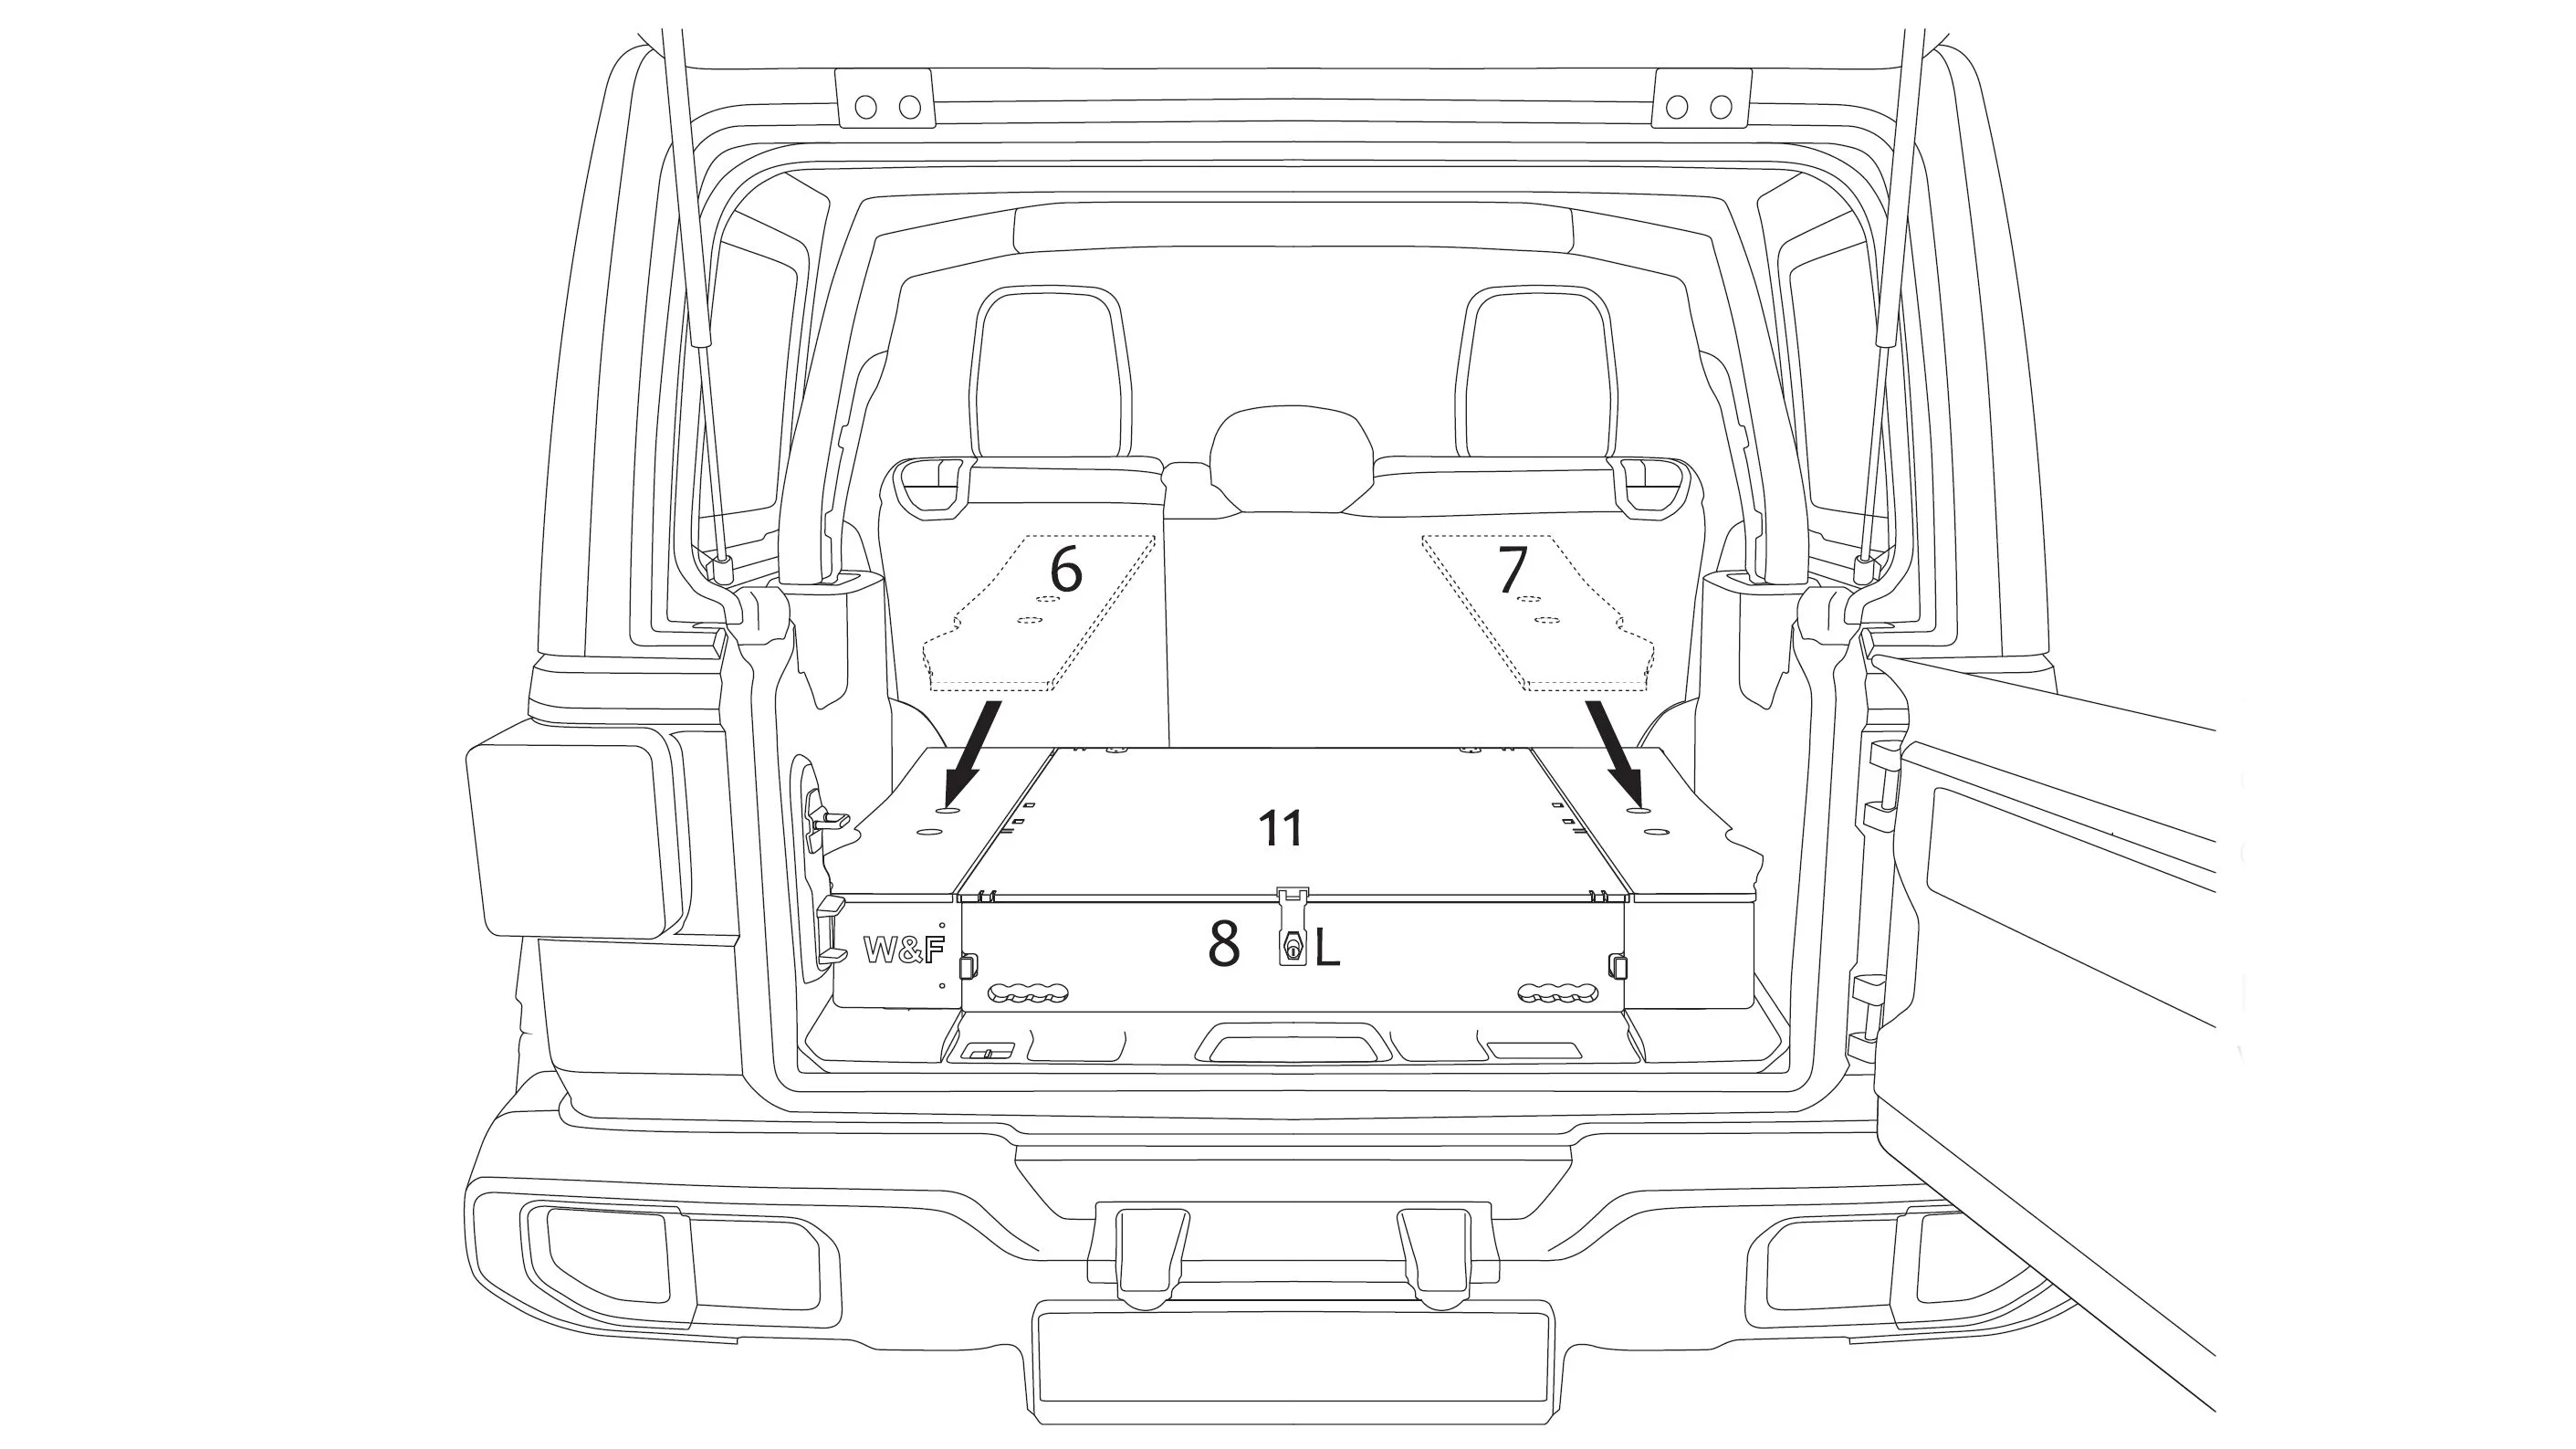
Note: these dividers can be positioned in four different locations within the drawer. This versatility allows you to create customized compartments, ensuring efficient use of space and easy access to your items.
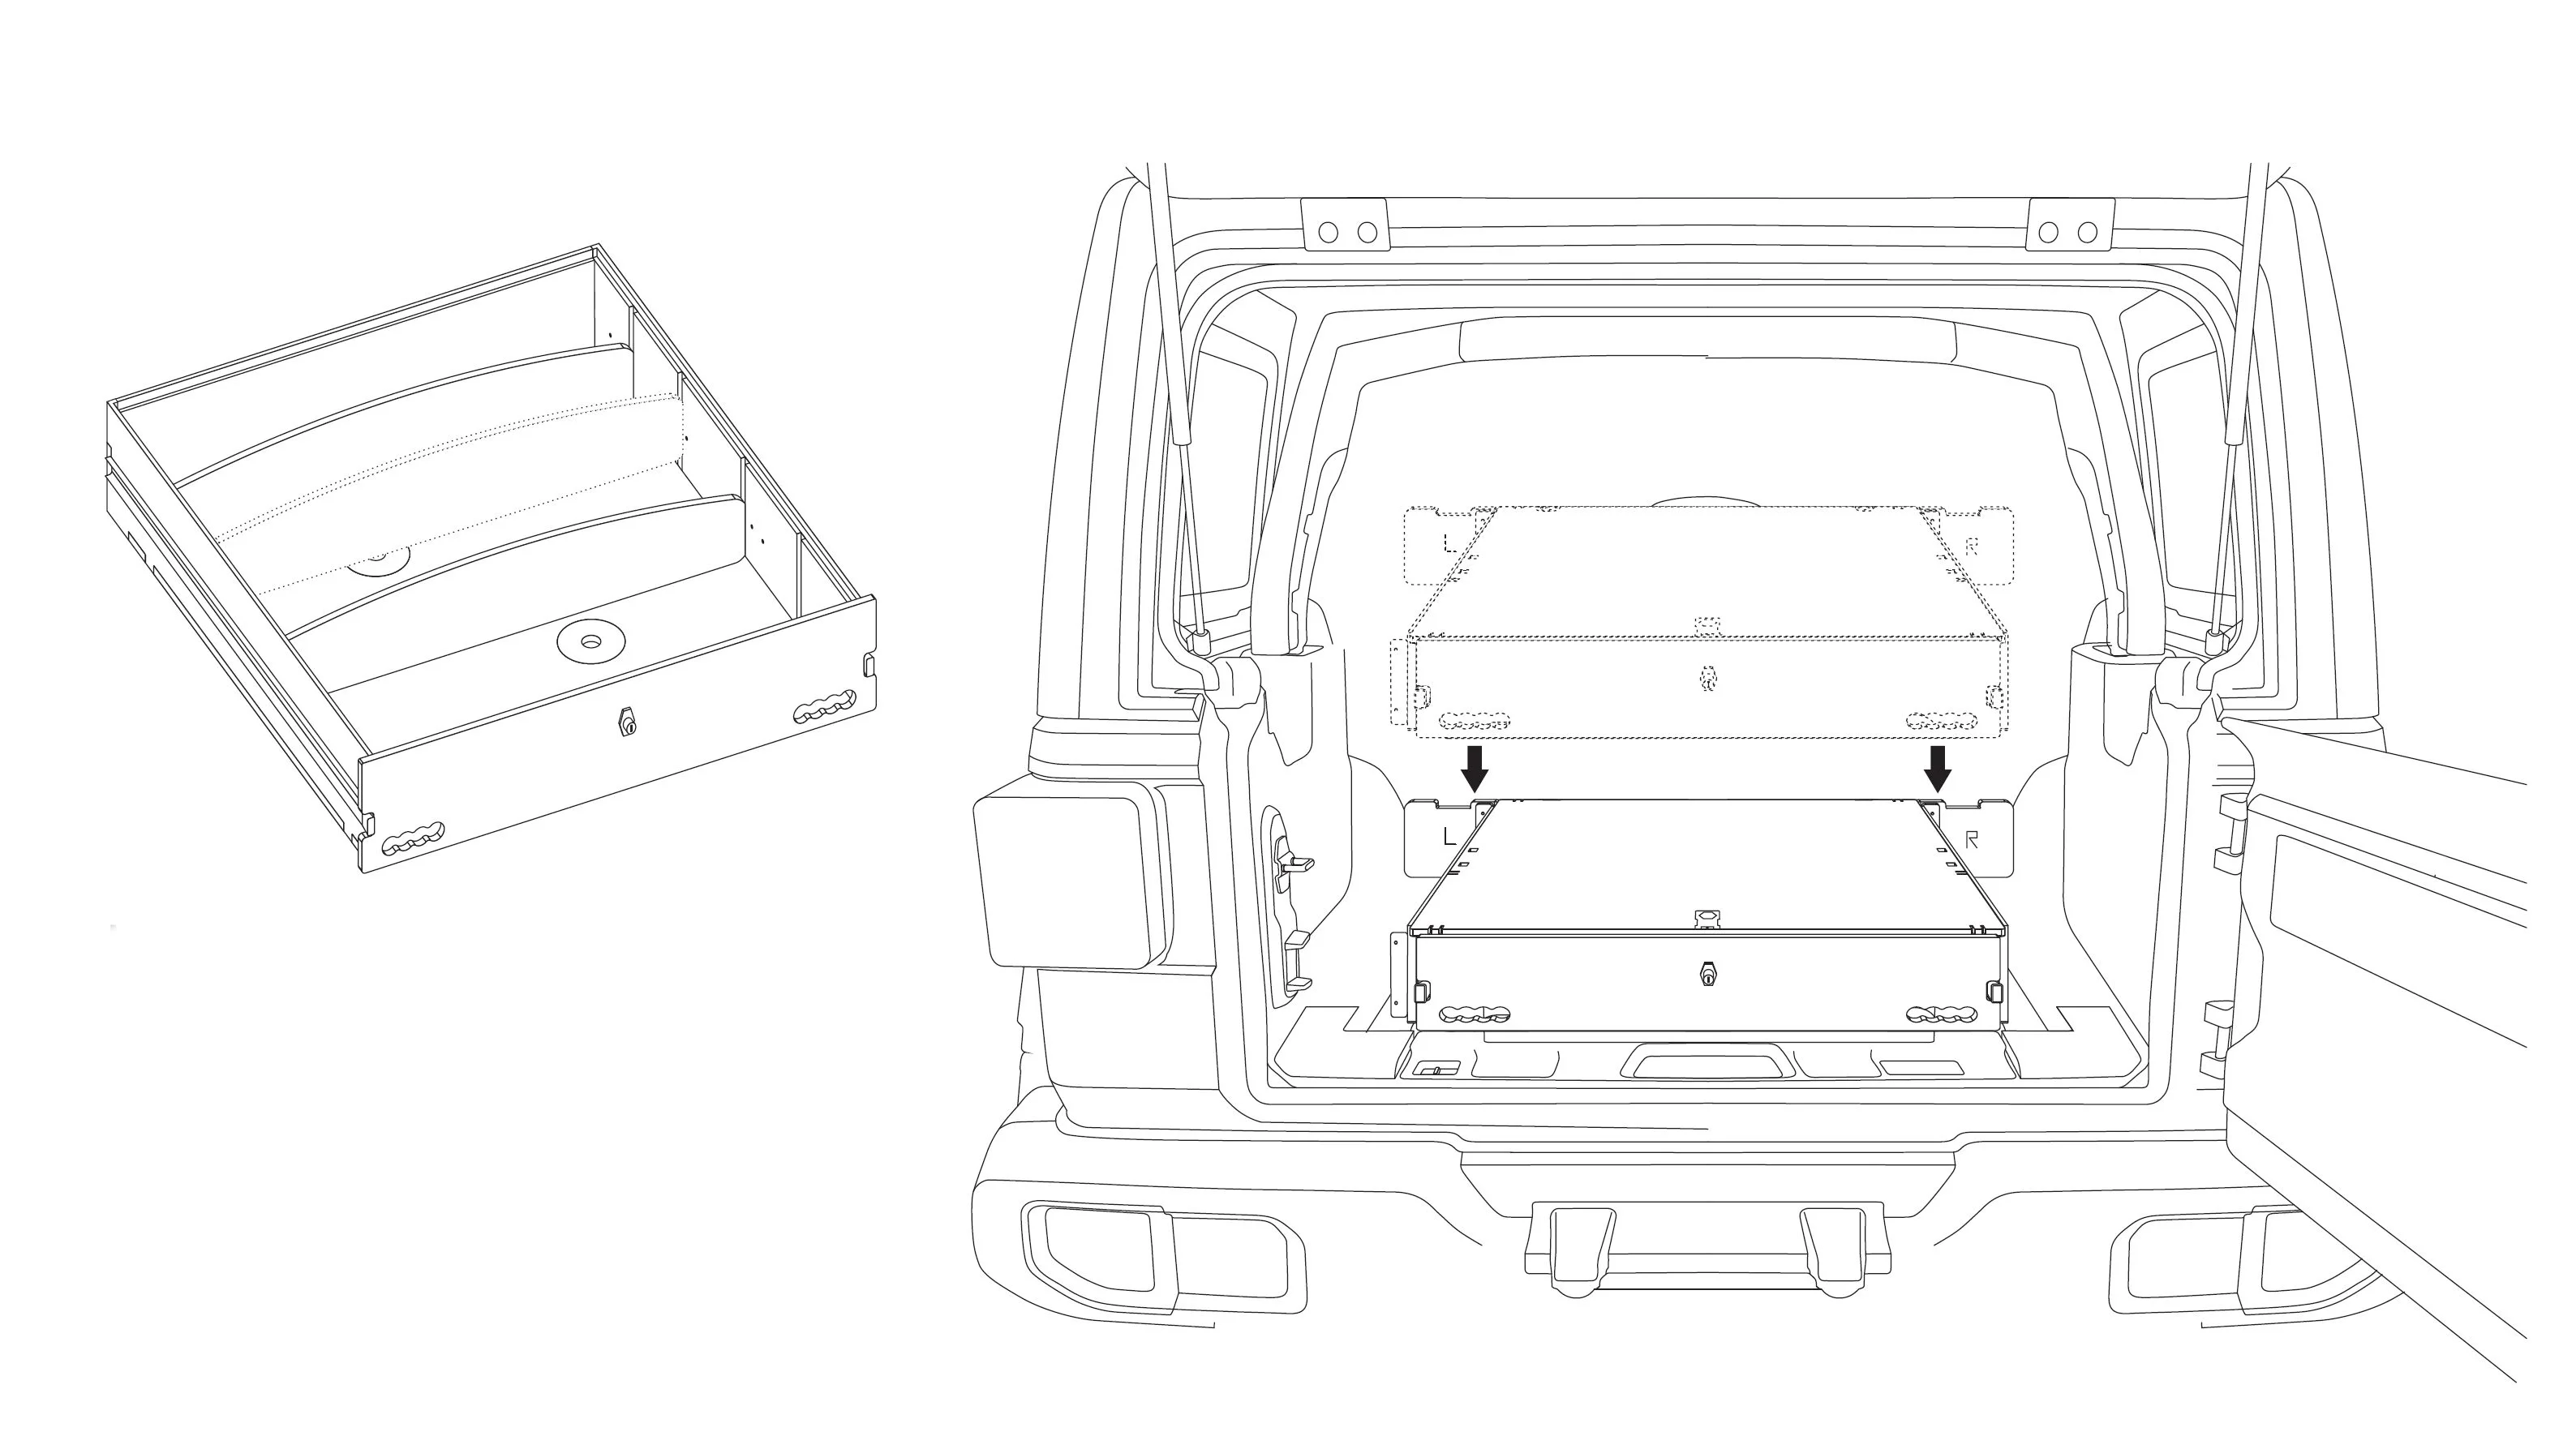
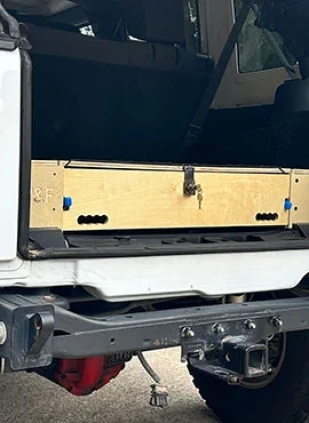
5. Securing the Drawer in Your Jeep
Once the drawer is placed in the trunk, align the holes in the right and left support brackets with the corresponding holes in the floor of your Jeep. Take the 4 long screws provided in the kit. Refer to the illustrations in Picture View A and B as a guide, and proceed to screw the box to the floor using these screws. Ensure each screw is tightened appropriately for a stable and secure fit. Connect the Front Left Side Support (9) to the Left Side Support (4). Connect the Front Right Support (10) to Support (5). If your Jeep has a factory subwoofer there is no need to install the Front Right Support (10) as shown at the picture below.
6. Operating the Drawer
After securing the drawer, you can safely unfold the rear seats back into their original position. With this, the installation process is complete. Your new drawer system should now be securely in place and ready for use. To open the drawer, press the flags (F) (depending on the batch there are two or one flags) with your finger and simultaneously pull the handle. To close the drawer, push it back in until you hear or feel it snap shut, confirming it is securely locked.
Remember, the drawer should remain firmly closed without pressing the flag. This is a safety feature to prevent accidental opening.
Note: after the drawer installation, gently open and close the drawer a few times to ensure it operates smoothly. The drawer should open easily with one hand and without requiring excessive force. If the drawer doesn’t open smoothly or seems to stick, inspect the bottom of the box underneath the drawer. Occasionally, foreign objects can cause obstruction. Clear any things you find to ensure smooth operation. The maximum load capacity for the fully extended drawer is 100 Ibs!

7. Installing Side Covers Post-Drawer Installation
After the drawer is installed, it's time to put in the side covers. If your Jeep model does not have a subwoofer, use Lids (6) and (7). If you Jeep has a factory subwoofer, use only left removable lid (6). Any cover not used for your specific setup can be discarded.
Installing the Covers
These covers are designed to slide easily into place alongside the drawer. They are not fixed attachments, so they can be removed or reinserted as needed.
Flexibility in Usage
Given their easy-to-install design, you have the flexibility to remove these covers completely if you prefer an open setup.
Flexible Lid Opening Mechanism
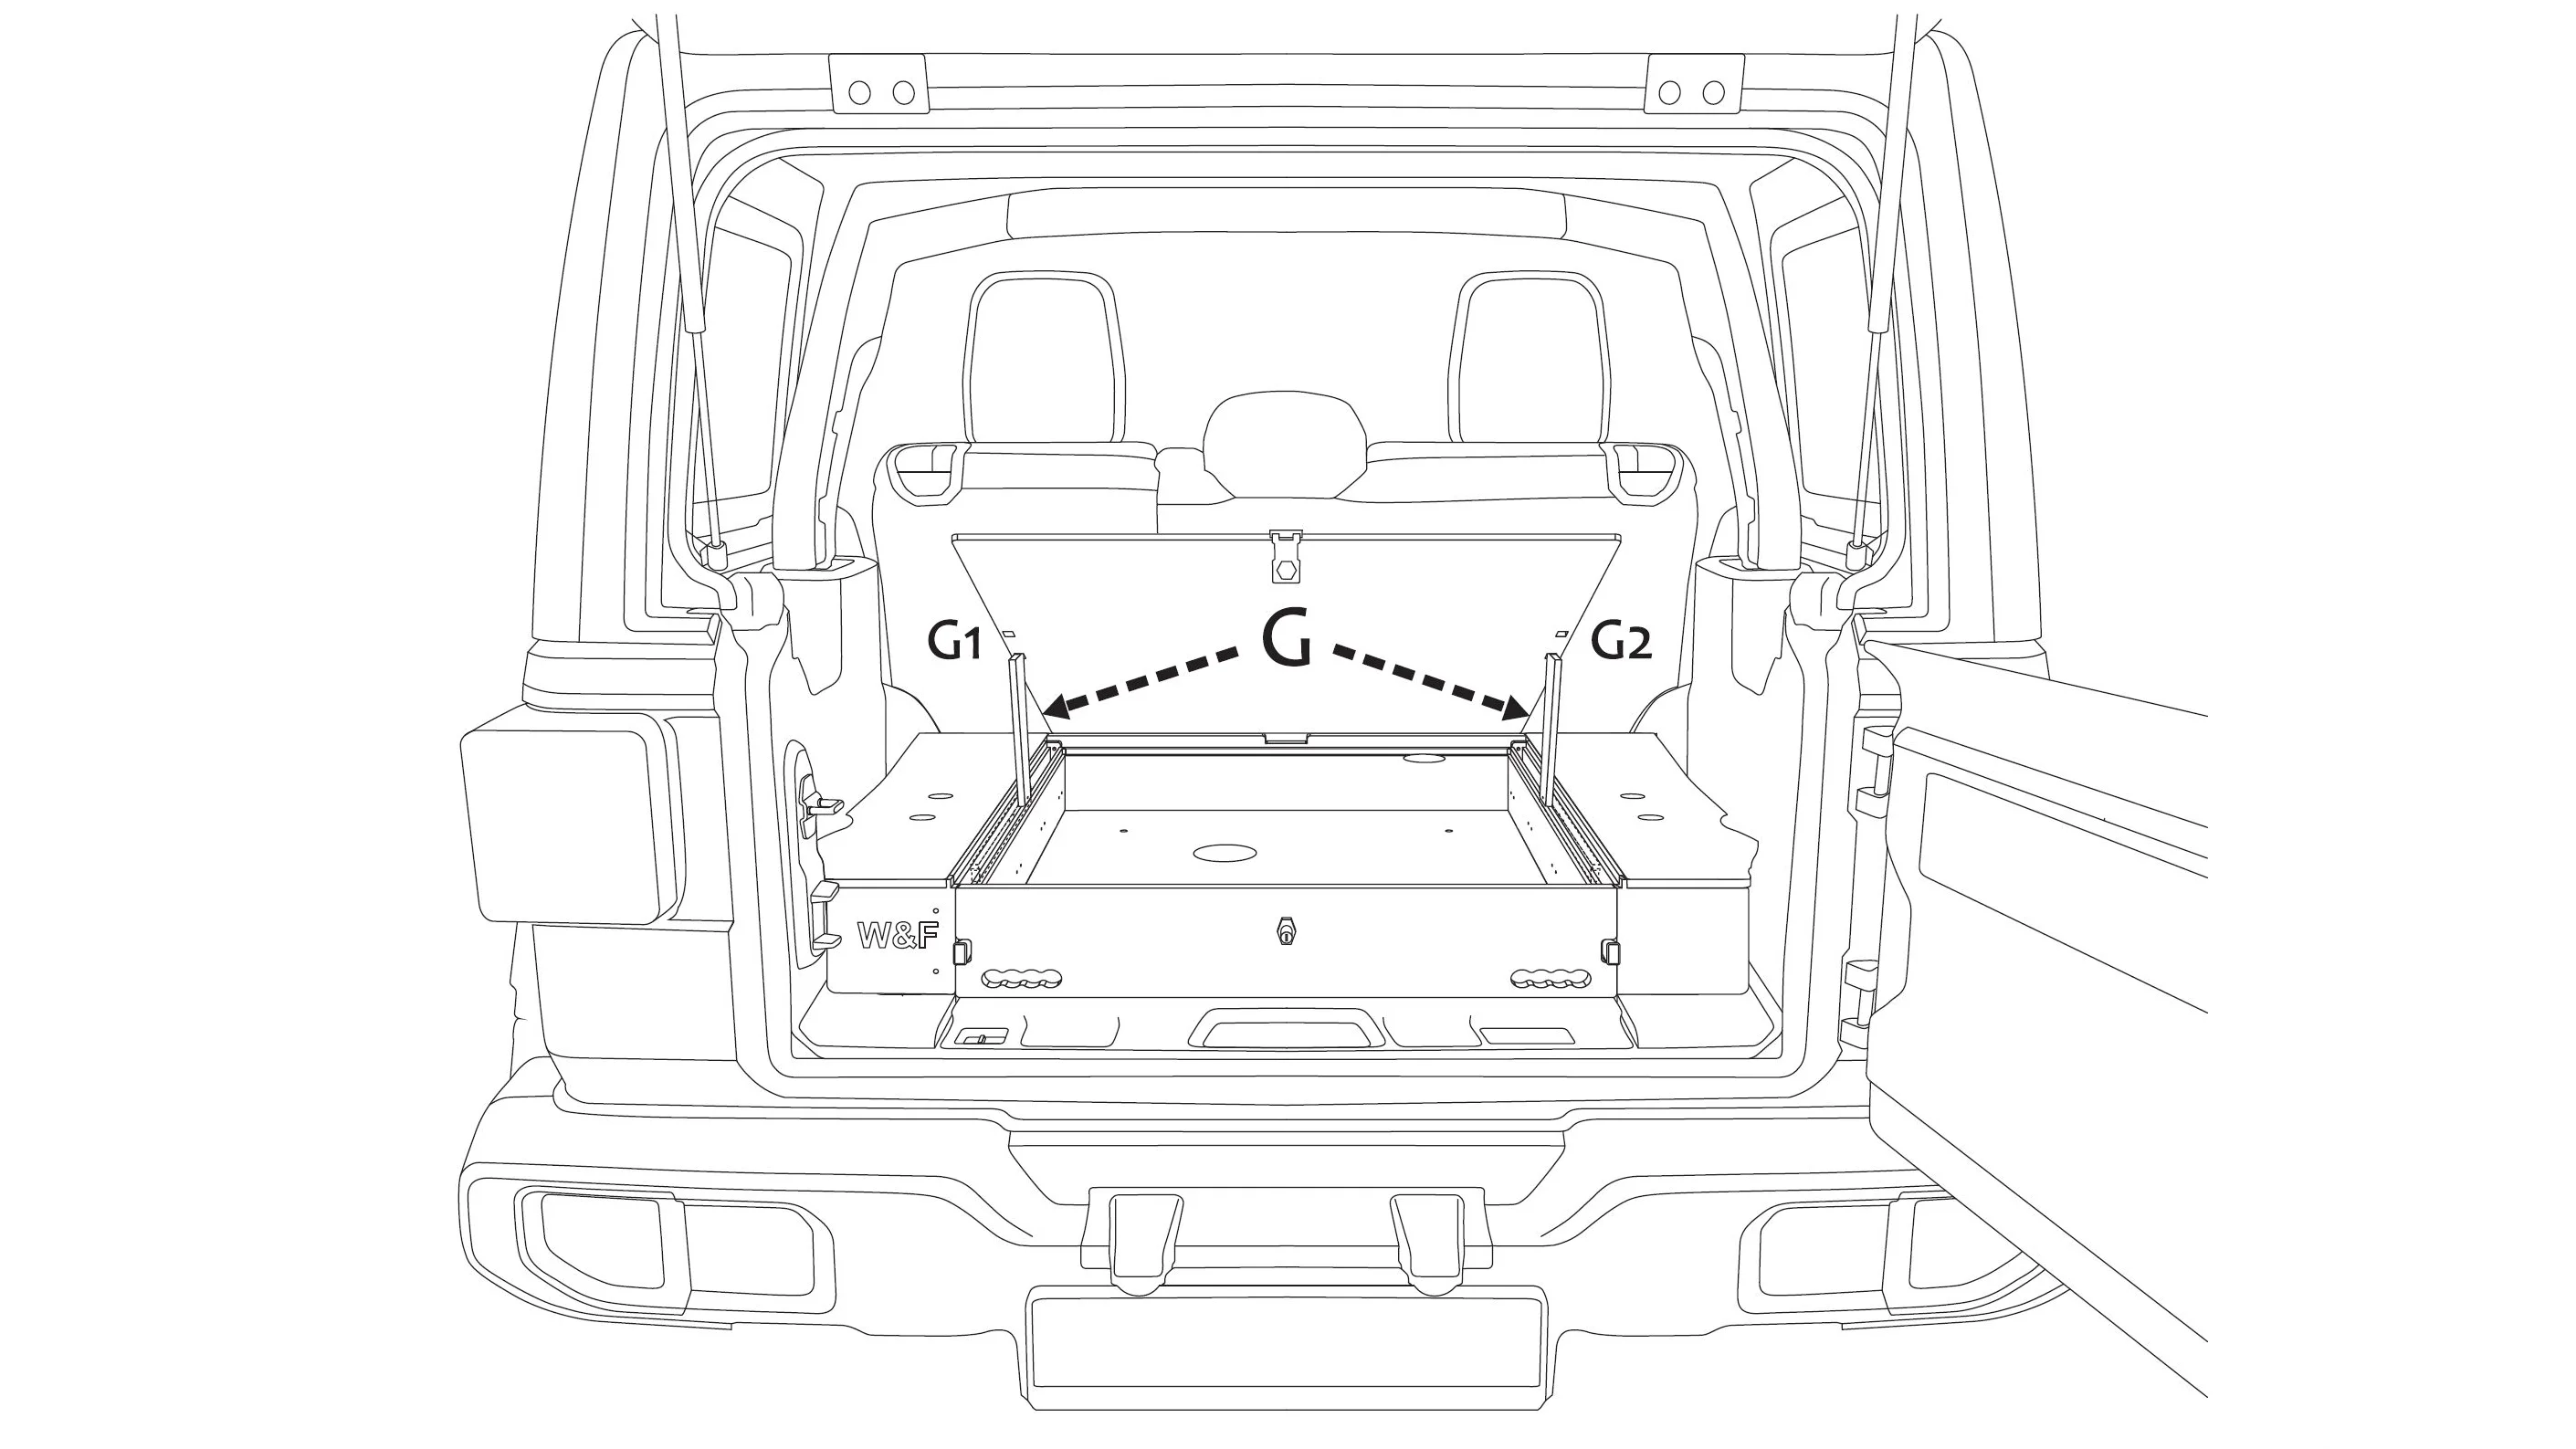
We've designed the top lid (11) of this product for convenience; you can open it whether the drawer is open or closed. To open the lid, simply lift it
upwards. If you require additional support or stability, you can install one or both of the provided supports. (View G).
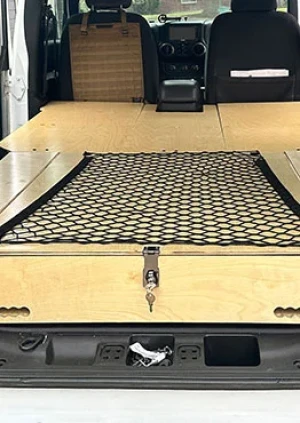
Note: the top lid (11) can be joined to the drawer module (8) by using a keyed hasp lock (L). This option provides additional security your drawer contains.
Use keys (17) provided in the kit to close and open the lock.
8. Adjusting Lid Opening Angle
For different opening angles, you have the option to use various holes for installing the stanchions YS (G1, G2). This feature allows you to customize the lid's position according to your specific needs or preferences.
Read more about our products.
Happy camping!